
Understanding Soil: The Complete Beginner’s Guide
If you only remember one thing from this article, remember this: more plants are killed by the wrong soil than by wrong watering habits. In fact, most “watering problems” are really soil problems in disguise. Get the soil right and half your growing headaches disappear before they start — and this is just as true for a monstera on a windowsill as it is for a pot of basil or any other herb.
I grow mostly herbs, so that’s where most of my examples come from. But soil doesn’t know or care what you’re growing. Understand what it’s actually doing for the plant, and you can apply the same thinking to a herb pot, a raised bed, or any houseplant you own.
Here’s the short version, if you’re in a hurry and don’t have time read all :
- Growing anything in a pot? Use a proper potting mix — never plain garden soil. It’s too heavy, compacts in containers, and drowns roots.
- Growing in the ground? Use your garden soil, improved with compost.
- Not sure what any of that means yet? Keep reading — that’s exactly what this guide is for.
I’ve spent years using different mixes on my own terrace, killing a few plants along the way so with sharing the things I have learned, you don’t have to make the same mistakes. Below is everything I now know about soil, written the way I wish someone had explained it to me when I started.
Contents
- Why soil matters more than you think
- The four things every soil is made of
- Topsoil, garden soil, compost and potting mix — what’s actually the difference
- The three ingredients of soil: sand, silt and clay
- Try this: the soil texture test in a jar
- Drainage — the single most important thing to get right
- Not every plant wants the same soil
- Match the mix to how you water, not just to the plant
- Soil pH, explained simply
- Getting your soil properly tested
- What good potting mix additives actually do
- Building your own mix — the components, and how I combine them
- How to actually check moisture, instead of guessing
- Reading a bag of potting mix like a pro
- Container herbs vs. plants in the ground
- Common soil mistakes beginners make
- When to refresh or replace your potting mix
- Soil-related symptoms: quick troubleshooting
- FAQ
Why soil matters more than you think
Every plant needs three things: light, water and nutrients. Soil is where two of those three actually happen — it’s the reservoir your plant drinks and eats from, and it’s also where the roots breathe.
Yes, breathe. Roots need oxygen just as much as they need water, and that’s the part beginners usually miss. If the soil around the roots is compacted or waterlogged, there’s no space left for air, and the roots slowly suffocate. That’s what “root rot” usually is — not a disease that appears out of nowhere, but roots drowning because the soil couldn’t drain.
So when I talk about “good soil,” I’m really talking about soil that does three jobs at once: holds enough water for the plant to drink, holds enough nutrients to feed it, and still leaves enough air space for the roots to breathe. Everything else in this guide is really just different ways of getting that balance right.
The four things every soil is made of
Zoom in on any handful of soil, whether it’s a bag of potting mix or a scoop from your garden, and you’re really looking at four ingredients mixed together:
- Mineral materials — tiny broken-down fragments of rock: sand, silt and clay. The ratio between the three decides the soil’s texture, which I’ll get into properly in the next section. Too much clay and the soil holds onto water and starts rotting roots; too much sand and water drains straight through before the roots get a chance to take any up.
- Organic matter — decaying plant and animal material, humus, and the living microorganisms that are breaking it all down. This is the part that improves soil structure, boosts how much water it can hold, keeps pore space open for air, and slowly releases nutrients as it decomposes.
- Water — carries dissolved nutrients to the roots and keeps the microbial life in the soil going.
- Air — sounds like an odd thing to find in soil, but it lives in the same pore spaces as the water. Roots (and the beneficial organisms living alongside them) need to breathe, and air is where that oxygen comes from.
Here’s the bit that took me a while to appreciate: there’s no single “correct” ratio of these four. A seed-starting mix is deliberately built to hold more air and less water than a mix for a thirsty, established plant. A gritty Mediterranean-herb mix leans harder on mineral drainage and lighter on organic matter than a mix for basil or mint. Once you think of soil as these four ingredients in an adjustable balance, rather than one fixed “good soil” recipe, the rest of this guide — texture, drainage, pH, additives — is really just different ways of tuning that balance for what you’re growing.
Topsoil, garden soil, compost and potting mix — what’s actually the difference
This is the question I get asked most, and it trips up almost every beginner, because garden centres use these words loosely and the bags don’t always make it obvious. Here’s how I think about each one:
| Type | What it actually is | Best used for | Should you put it in a pot? |
|---|---|---|---|
| Topsoil | The natural upper layer of earth (roughly the top 20–30 cm), dug up and bagged, often with stones and debris removed | Filling in low patches, building up garden beds, bulk landscaping | No — too heavy, compacts hard in a container |
| Garden soil | Topsoil that’s been blended with some compost or nutrients for planting directly in the ground | Flower beds, raised beds, vegetable patches, in-ground herbs | No — same compaction problem in a pot |
| Compost | Fully decomposed organic matter (plant material, sometimes manure) — dark, crumbly, nutrient-rich | Enriching garden soil or potting mix; it’s an amendment, not a growing medium on its own | Only as one ingredient in a mix, never alone |
| Potting soil / potting mix | Usually contains no real “soil” at all — it’s a light, soilless blend (coco coir or peat, plus perlite or vermiculite, sometimes compost) designed specifically for containers | Any herb growing in a pot, indoors or outdoors | Yes — this is what pots need |
The one-line version: soil from the ground is for the ground, and potting mix is for pots. Garden soil and topsoil are dense and full of real mineral particles that pack down tightly once they’re confined in a container with nowhere to go. Potting mix is deliberately light and fluffy so water and air can keep moving through it even in a small, enclosed space.
I don’t recommend scooping soil from your garden into a pot, even if it looks lovely and rich. It behaves completely differently once it’s trapped in a container.
A closer look at each, with the trade-offs:
Potting mix — lightweight, drains excellently, gives roots plenty of oxygen, and behaves consistently bag after bag. The downside: it dries out faster than garden soil, any nutrients it starts with run out after a few months, and good-quality mix isn’t cheap (one more reason I make my own — see the recipe below).
Compost — feeds soil microbes, loosens compaction, and adds slow-release nutrients. But nutrient content varies from batch to batch, so it’s not something to rely on as a plant’s entire growing medium, or as its only source of food. It also holds too much moisture to work well on its own in small containers or seed trays. As a top dressing worked into garden soil, 5–8 cm (2–3 inches) spread over the surface is plenty — you don’t need to dig it in.
Topsoil — supplies the mineral bulk that gives a garden bed its structure, holds water, and lets nutrients move through. Quality varies a lot between bagged brands, though, it rarely has much nutritional value on its own, and it should never go into a container.
The three ingredients of soil: sand, silt and clay
Every natural soil is a mixture of three particle sizes: sand (the largest, gritty particles), silt (medium, almost floury) and clay (the smallest, sticky when wet). The proportions of these three determine what gardeners call soil “texture” and texture is what decides how water moves through it.
- Sandy soil feels gritty, drains very fast, and doesn’t hold on to nutrients well. It warms up quickly in spring but dries out quickly in summer.
- Silty soil feels smooth, almost soapy, and holds water and nutrients better than sand — but it’s rare to find on its own in a garden.
- Clay soil feels sticky when wet and turns rock-hard when dry. It holds water and nutrients well, sometimes too well — clay is the texture most likely to drown herb roots if you’re planting straight into the ground.
- Loam is the sweet spot: a balanced mix of all three (roughly 40% sand, 40% silt, 20% clay), giving good drainage and good water-holding capacity at the same time. If you’re improving garden soil for herbs, loam is what you’re aiming for.
You’ll also sometimes see peat soil (naturally decomposed organic matter, historically harvested for potting mixes but now being phased out for environmental reasons — more on that below) and chalk soil (alkaline, often too alkaline for herbs that prefer neutral soil).
Try this: the soil texture test in a jar
The section above explains sand, silt and clay in theory. This test is how you actually find out what proportion of each you’ve got in the ground you’re planting into — without sending a sample to a lab.
Important: this test is for garden soil, not potting mix. It only works on mineral, ground-type soil — the soil already in your garden, or a bag of topsoil or garden soil. Don’t bother running it on potting mix, homemade or bagged: potting mix is mostly organic material (coir, peat, bark, compost) plus lightweight additives like perlite, none of which settle into clean sand/silt/clay layers the way real ground soil does. If you want to sanity-check a potting mix instead, use the squeeze test described later in the recipe section.
Why bother testing garden soil at all? Because you can’t reliably judge texture by eye. Soil that looks “just dirt” to most of us could easily be 60% clay, which will sit wet and starve roots of air, or 70% sand, which will drain so fast that water and nutrients wash straight past the roots. Knowing roughly which one you’re dealing with tells you what to fix: heavy clay needs organic matter and drainage worked in; sandy soil needs organic matter to help it hold water and nutrients for longer. Without this test, you’re guessing and hoping.
Here’s the test I use on any new bed, or any bagged topsoil or garden soil, before I plant into it:
- Take a sample. Dig soil from a few centimetres below the surface (surface soil isn’t representative), remove any stones, roots and debris, and crumble it up. You need enough to fill about a third of a tall, straight-sided clear jar — a used jam jar is perfect.
- Add water. Fill the rest of the jar with water, leaving a little space at the top, and add a small pinch of dish soap or salt — this helps the particles separate cleanly instead of clumping together.
- Shake it hard for a full minute or two, until everything is properly suspended in the water with no clumps left.
- Set it down somewhere flat and undisturbed, and now wait: the biggest, heaviest particles settle first, so you’ll actually see distinct layers appear over time. Sand settles within the first minute or two, silt takes a few hours, and clay — the finest particle of all — can take a full 24–48 hours to fully settle, sometimes leaving the water slightly cloudy even after the visible layer has formed.
- Once it’s fully settled (give it the full 24–48 hours to be sure), measure each layer with a ruler against the side of the jar: sand at the bottom, silt in the middle, clay on top. Any bits of organic matter tend to float, and will sit right at the surface or on top of the water.
Reading the result: work out roughly what percentage of the total settled depth each layer takes up. As a rough guide:
- Mostly a thick bottom (sand) layer, thin everything else → sandy soil — drains fast, dries out fast, needs organic matter to help it hold on to water and nutrients.
- Mostly a thick top (clay) layer → clay soil — holds water and nutrients well but drains slowly and compacts easily; needs organic matter and grit worked in to open it up.
- A fairly even split across all three, roughly 40% sand / 40% silt / 20% clay → loam — the balanced texture most plants, herbs included, are happiest in.
You don’t need to be precise to the percentage point. The point of the test is simply to see, with your own eyes, which particle size is dominating your soil — because that’s what’s actually driving whether it drains too fast, holds on too tight, or gets the balance about right.
Drainage — the single most important thing to get right
If there’s one section of this guide to read twice, it’s this one.
“Drainage” simply means how easily water moves through the soil and out the bottom, under gravity. As water leaves, air moves in to take its place — which is exactly what the roots need. Soil that drains well lets this happen at a steady, moderate pace: not so fast that the plant never gets a proper drink, and not so slow that water just sits there.
When soil can’t drain — because it’s too dense, because there’s no way out of the pot, or both — it becomes waterlogged. Waterlogged soil pushes all the air out, the roots can’t breathe, and they start to rot. This is genuinely the single most common way beginners lose a plant or herb, and it usually gets blamed on “overwatering” when the real issue is that the soil (or the pot) never let the water leave in the first place.
Two things control drainage in a container:
- The pot itself. It needs drainage holes in the base. Without them, water has nowhere to go, no matter how good your soil is. If you’ve fallen in love with a pot that has no holes, use it as a decorative outer cover and keep your herb in a plastic nursery pot with holes inside it.
- The mix itself. This is where potting mix earns its keep — its light, chunky ingredients (more on this below) create air pockets that plain soil simply doesn’t have.
Not every plant wants the same soil
Here’s something that took me a long time to properly appreciate: the right soil isn’t just about the plant category (herb, houseplant, vegetable) — it’s about the roots themselves.
Roots come in different shapes, and they want different things from the soil around them:
- Thick, fleshy roots (rosemary, lavender, sage as they mature; many houseplants like monsteras and other aroids) generally want a chunkier, more open mix with plenty of large particles — think coarse perlite, bark and grit — so there’s lots of air space between the chunks.
- Fine, fibrous roots (basil, parsley, chives, seedlings of almost anything) want a finer mix that still drains well but holds a bit more moisture close to the smaller root hairs, which can’t reach as far to find water.
- Vigorous, spreading roots (mint is the obvious herb example) are fairly tolerant of a range of textures, since they grow so readily, but still do best with decent drainage rather than a dense, waterlogged mix.
The practical upshot: using exactly the same bag of mix for every single plant you own is one of the more common beginner habits, and one of the easier ones to fix. If you only take one thing from this section, let it be this: before you repot anything, have a quick look at the roots you’re dealing with, and let that — not just the species name on the label — guide how chunky or fine the mix should be.
Match the mix to how you water, not just to the plant
This one surprised me when I first came across it, and it’s rarely mentioned in beginner advice: the “right” soil also depends on you — specifically, on how often you actually water.
If you’re a frequent, little-and-often waterer, a mix that drains very fast will dry out again before you’ve even finished the watering can, and you’ll be forever topping it up. If you’re a forgetful or infrequent waterer, that same fast-draining mix might actually suit you well — while a moisture-retentive mix would leave your plant sitting in damp soil for days between waterings, heading straight toward root rot.
So when you’re building or buying a mix, it’s worth being honest with yourself about your own habits, not just looking up “the right soil” for the species. Two people can grow the exact same herb successfully with two different mixes, simply because one waters daily and the other waters weekly. If you know you’re prone to overwatering, lean your mix toward more drainage (more perlite or grit) than the “standard” recipe calls for. If you regularly forget to water, lean the other way, toward a bit more moisture retention.
Your climate and growing spot push you toward a watering frequency too, whether you’d choose it or not. On my terrace in Rome, summer heat dries pots out fast, so I end up watering regularly through the warmer months regardless of my usual habits — it’s the terrace, not me, setting the pace. A hot balcony, a sunny windowsill, or a small pot that dries out in a day will all push you toward more frequent watering, which is exactly the situation where a well-draining mix earns its keep: it lets you water often to keep up with the heat without the soil staying wet enough, for long enough, to rot the roots.
Soil pH, explained simply
pH measures how acidic or alkaline your soil is, on a scale of 0 to 14, with 7 being neutral. It matters because it affects how easily roots can actually absorb the nutrients that are sitting right there in the soil — get the pH badly wrong and your herb can be “starving” even in nutrient-rich soil, simply because it can’t take the nutrients up.
Most plants (and herbs) are relatively forgiving and grow happily in a slightly acidic to neutral range, roughly pH 6.0–7.5. A few useful specifics from my own growing:
- Basil, mint, chives and parsley: happiest around pH 6.0–7.0.
- Rosemary, thyme, sage and lavender: tolerate slightly more alkaline soil, up to around pH 7.5, and actually dislike soil that’s too acidic or too rich.
Testing at home doesn’t need to be complicated. A cheap probe-style soil pH meter (a few pounds/dollars online) gives a rough reading in seconds — good enough for home plant/herb growing. If you want to adjust pH: garden lime raises it (makes soil more alkaline), and things like sulphur or peat moss lower it (make soil more acidic). For container herbs, honestly, I rarely bother adjusting pH directly — I just start with a good potting mix, which tends to sit in a sensible range already.
Getting your soil properly tested
A cheap pH probe is fine for a quick container check, but if you’re about to dig a proper garden bed and start piling in compost and amendments, it’s worth doing this properly first rather than guessing. Most countries have a local agricultural extension service, university lab, or garden-centre soil-testing service that will test a sample for you cheaply — it tells you your actual pH and nutrient levels before you spend money “fixing” a problem you might not even have.
Two extra checks worth knowing about, especially if you’re growing herbs to eat:
- If you’re in a newly built or recently renovated house, it’s worth testing your garden soil for leftover chemicals from building materials before you start an edible bed. Even if you’re not eating from that particular patch, birds, pollinators and other wildlife visiting your garden can be affected by anything harmful the plants take up from contaminated soil.
- More compost is not automatically better. Piling on far more than a plant needs doesn’t just waste it — the excess nutrients can wash away in heavy rain and end up in local waterways. Little and often, worked lightly into the surface, beats one enormous dose.
What good potting mix additives actually do
Bags of potting mix are usually a blend of a few of these. Knowing what each one does means you can read a bag’s ingredients — or build your own mix — with actual understanding instead of guessing:
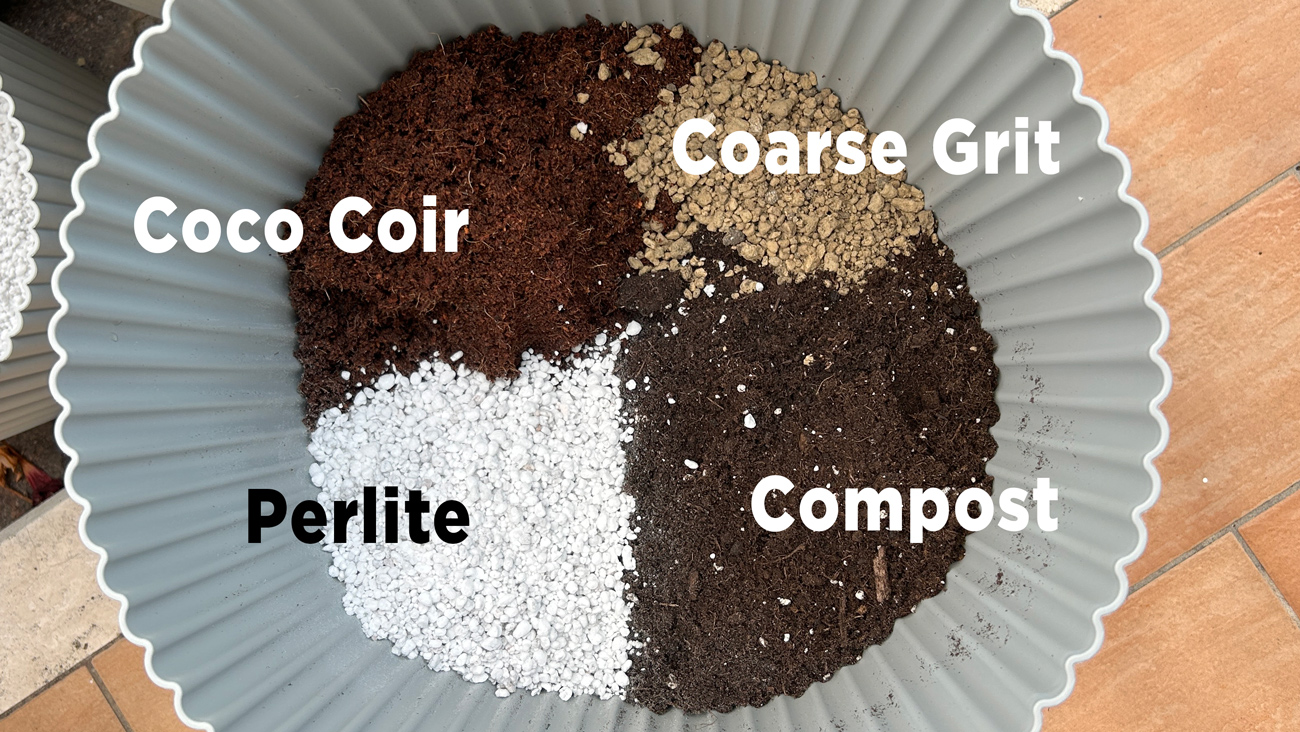
- Coco coir (coconut fibre/coco peat): holds moisture well, creates air pockets, slightly alkaline, and a good, sustainable stand-in for peat moss.
- Perlite: small white volcanic granules. Lightweight, sterile, holds some water but its main job is drainage and air space — it stops the mix from compacting.
- Vermiculite: a spongier mineral than perlite, holding more water for longer. Better suited to thirstier plants; perlite is usually the better default for herbs, most of which prefer to dry out a bit between waterings.
- Peat moss: traditionally the base of most potting mixes — great at holding water, but acidic and, importantly, an environmental concern, since peat bogs take centuries to form and store a huge amount of carbon. I’ve moved away from peat-based mixes in favour of coco coir, and most gardeners are heading the same way. If you see “peat-free” on a bag, that’s generally the better choice.
- Compost: fully broken-down organic matter — this is your nutrient source in a DIY mix.
- Pine bark (fine grade): absorbs and slowly releases moisture, and adds extra air space — particularly good in mixes for Mediterranean herbs that want to dry out between waterings.
Building your own mix — the components, and how I combine them
I don’t buy bagged potting mix any more — it’s cheaper, and it lets me actually tailor the mix to the plant and to my own watering habits, rather than accepting whatever ratio a bag happens to contain.
Beyond the coco coir, perlite, vermiculite, compost and pine bark already covered above, a few more building blocks are worth knowing if you want to go further — these are the ingredients I keep seeing serious growers reach for when they build “chunky” mixes for thick-rooted plants:
- Pumice: a lightweight volcanic rock, similar in purpose to perlite (drainage and air space) but heavier, so it doesn’t float to the surface every time you water — useful in mixes that get watered often.
- Coarse horticultural sand or grit: adds weight and drainage without adding nutrients — a good addition for anything that wants to dry out fast between waterings.
- Fine pine bark or coco chips: chunkier than pine bark fines, these hold their structure for longer and are the backbone of most “chunky” mixes for plants with thick, fleshy roots.
- Biochar: a charcoal-like additive that holds onto nutrients and moisture in tiny pores while still allowing airflow — a smaller-scale addition rather than a bulk ingredient.
Here’s what I actually mix, based on root type and my own conditions: I’m mostly on a terrace in Rome, where summer heat dries pots out fast and I end up watering pretty regularly through the season — so I lean toward a mix with plenty of drainage. Frequent watering into a mix that also holds onto moisture is a quick route to waterlogged roots; frequent watering into a freer-draining mix just keeps up with what the heat is taking out.
What I actually use, most of the time: coco coir, compost, perlite, mixed through for drainage:
All-purpose mix, what I actually use most of the time for fine-rooted plants (basil, parsley, chives, coriander/cilantro, most seedlings):
- ⅓ coco coir — for moisture retention
- ⅓ compost — for nutrients, homemade or from a garden centre
- ⅓ perlite plus a handful/bit of extra grit (small stones) — for drainage and aeration
For anything with thicker or woodier roots (rosemary, thyme, sage, oregano, lavender, and most houseplants with fleshy roots — these want to dry out between waterings, not stay moist), I use chunkier mix :
- 2 parts compost
- 1 part perlite, pumice or coarse grit — more if you tend to overwater, less if you tend to forget
I shift the ratio to lean harder on drainage — closer to 2 parts compost to 1 part perlite/grit — since those want to dry out between waterings rather than stay moist.
I haven’t used vermiculite much myself — it’s not easy to find locally — but from what I’ve read it can be a genuinely better fit than perlite for herbs that prefer to hold a bit more moisture, since it retains water longer while still helping aeration. It’s on my list to actually test properly rather than take on faith, and I’ll update this once I have.
Mix everything by hand in a bucket or tub before it goes into the pot — you want it evenly blended, not layered.
The test I use: grab a handful, squeeze it, and let go. A good mix falls apart loosely in your hand. If it clumps together like mud, it’s too wet or too heavy and needs more perlite or grit.
Mix everything by hand in a bucket or tub before it goes into the pot — you want it evenly blended, not layered.
The test I use: grab a handful, squeeze it, and let go. A good mix falls apart loosely in your hand. If it clumps together like mud, it’s too wet or too heavy and needs more perlite.
For the exact quantities I use, the products I buy, and a few extra notes specific to herbs, I’ve got a dedicated post on my own potting mix recipe: Best Soil for Herbs – How to Make Your Own Potting Mix.
How to actually check moisture, instead of guessing
A lot of soil problems come down to one thing: not really knowing how wet the soil is until it’s already too late. A couple of low-cost habits fix that:
- Grow in clear (transparent) plastic pots, tucked inside a decorative outer pot if you want them out of sight. You can see at a glance whether the soil is dark and damp or pale and dry, and you can actually see root health and colour — instead of guessing from the surface, which often looks dry while the middle of the pot is still soaking wet.
- Get to know the weight of a plant just after watering versus a few days later. A dry pot is noticeably lighter than a freshly watered one. Once you’ve felt the difference a couple of times, lifting the pot becomes a faster, more reliable check than poking a finger in the top inch of soil, which tells you very little about what’s happening further down.
- A cheap moisture meter is a reasonable add-on if you want a number rather than a feel, though it’s not essential — the clear-pot and weight tricks cost nothing and work for most beginners.
Reading a bag of potting mix like a pro
Bagged mix marketing leans hard on words like “premium,” “extreme growth,” or “makes your plants giant” — none of which tells you anything about what’s actually inside. Two quick habits change that:
- Flip the bag over and read the ingredient list, not the front cover. You’re looking for the same components covered above — coir or peat, perlite or pumice, some compost or bark — in sensible proportions, rather than a bag that’s mostly one cheap filler.
- Be a little sceptical of “all-purpose” claims. A single bagged mix can be a fine starting point, but as you’ve seen above, a thick-rooted plant and a fine-rooted seedling don’t really want identical soil — so treat any all-purpose bag as a base you might still want to adjust with extra perlite or compost, not a perfect one-size-fits-all answer.
Worth knowing too: bagged mix is NOT always pest-free before you’ve even opened it. Fungus gnats are drawn to moist bags with organic matter in them, and most bags have small ventilation holes built in — if a bag has been sitting in a warehouse or on a garden-centre shelf for a while, those holes (or any tear in the packaging) can be enough for gnats to get in, lay eggs, and start a population before it ever reaches your home. So it’s worth checking a bag for holes or damaged seams before you buy, and once it’s open, keeping it tightly resealed and dry rather than left open in a shed or balcony corner — that’s one more reason some growers prefer to build their own mix from ingredients they trust.
Container plants vs. plants in the ground
The advice above is written mainly for pots, because that’s how most beginners start (and how I grow most of my own herbs, on a terrace). If you’re planting straight into a garden bed instead, the approach is a little different:
- Don’t bring in bagged potting mix as your main soil — it’s designed for the enclosed, controlled conditions of a pot, not open ground.
- Improve your existing garden soil instead: dig over the top 30 cm or so to break up compaction, and work in a couple of inches of compost. That’s usually enough for herbs and most other plants, which generally don’t ask for rich soil.
- If your garden soil is heavy clay, improving drainage matters more than adding nutrients — work in extra compost and, if it’s really bad, coarse grit, rather than reaching for fertiliser.
Common soil mistakes beginners make
A few things I see constantly (and did myself, early on):
- Using garden soil in a pot. It looks like “real” soil, so it seems like the obvious choice — but it compacts hard in a container and drains badly.
- Choosing a pretty pot with no drainage hole. Even perfect soil can’t save a plant sitting in water with nowhere for it to go.
- Using the exact same mix for everything you grow. As covered above, root type and your own watering habits both matter — one bag for the whole plant collection is convenient, but it’s a compromise, not an optimum.
- Assuming rich, dark, nutrient-heavy soil is always best. Most herbs — especially Mediterranean ones — actually prefer lean, well-draining soil. Too much richness (and too much water) is what pushes leggy, floppy growth and weak flavour.
- Never checking the mix by hand. The squeeze test above takes ten seconds and tells you more than staring at the bag.
- Judging moisture by poking the surface. The top inch of soil dries out long before the middle of the pot does — see the moisture-check section for a better habit.
- Reusing old, compacted potting mix indefinitely. More on this next.
When to refresh or replace your potting mix
Potting mix isn’t forever. The organic parts break down over time, the structure collapses, and a mix that drained beautifully a year ago can be dense and waterlogged now, even though you haven’t changed anything about how you water.
As a general guide, refresh or replace the potting mix in a container roughly every 12–18 months, or whenever you repot. Signs it’s overdue: water sits on the surface rather than soaking in, the mix looks flat and compacted rather than light and open, or you’re watering the same as always but suddenly seeing yellowing or wilting.
Soil-related symptoms: quick troubleshooting
| What you’re seeing | Likely soil cause | Where to go next |
|---|---|---|
| Yellowing, wilting or drooping leaves | Usually waterlogged soil or no drainage hole — more often too much water than too little | Troubleshooting guide |
| Tiny flies rising from the soil surface when watered | Fungus gnats, drawn to consistently damp, compacted soil | How to get rid of fungus gnats |
| Water pools on top and takes ages to soak in | Compacted or old mix, or a pot with no/blocked drainage hole | Repot into fresh mix (see refresh guidance) |
| Rosemary/thyme/sage turning brown or dropping needles | Mix is too rich or too moisture-retentive for a Mediterranean herb | Growing Rosemary: the complete guide |
| Supermarket herb pot fading fast | Overcrowded roots in tiny, exhausted soil volume | Splitting and repotting a supermarket herb pot |
FAQ
Can I use topsoil to grow herbs in pots?
No — topsoil is too heavy and compacts in containers, cutting off air to the roots. Save topsoil for garden beds and use a proper potting mix in pots.
Is potting soil the same as potting mix?
Close enough that most gardeners (myself included) use the terms interchangeably, but technically “potting soil” can contain real soil while “potting mix” is soilless. Either way, always check the bag is intended for containers, not the garden.
What’s the best soil pH for herbs?
Most herbs are happy in the 6.0–7.5 range. Basil, mint and parsley lean toward 6.0–7.0; rosemary, thyme, sage and lavender tolerate slightly more alkaline soil.
Can I reuse old potting soil?
Sometimes, if you refresh it — mix in fresh compost and perlite to restore drainage and nutrients, and check it isn’t harbouring pests or disease from a previous sick plant. If a previous plant died from root rot or a soil-borne disease, don’t reuse that batch.
Do I need to add fertiliser to my potting mix?
Herbs generally don’t need much. Good compost usually supplies enough nutrients for the first few months; after that, an occasional light feed is usually plenty — more on that in a dedicated feeding guide.
Can I really use one bag of potting mix for every plant I own?
You can, and plenty of people do — but as covered above, root type (fine vs. thick and fleshy) and your own watering habits both affect what a plant actually wants from its soil. One bag is a workable compromise, not the optimum for every single plant.
Do you have a full recipe post for herb potting mix?
Yes — this article covers the principles behind soil generally, but my exact recipe, quantities and the specific products I use for herbs are in a dedicated post: Best Soil for Herbs – How to Make Your Own Potting Mix.
If your plant is struggling right now
Don’t just take my word on soil — go and look at the roots and the pot together; nine times out of ten the soil tells you exactly what went wrong. If it’s a herb, start with the Herb Struggling? Start Here page to diagnose the problem, or the Herb Pests & Problems guide if it looks like bugs rather than soil.
Before you go
If this has changed how you look at your plants — soil first, watering second — I’d genuinely like to know. So here’s my question for the comments: what have you been blaming on your watering can that might actually have been your soil all along? I read every comment, and the best ones usually end up becoming the next article.
If you’d rather not wait for the next one to show up here, subscribe to my Substack — it’s where I send new guides like this one, plus the smaller experiments and honest failures that don’t always make it onto the site.
And if you’re in the middle of fixing a soil problem right now, come find me and the rest of the Amazing Herb Garden Facebook group — there’s a good chance someone there has already made the exact mistake you’re worried about making, and lived to tell the story.
Affiliate disclosure: some links below are Amazon affiliate links, meaning I earn a small commission if you buy through them, at no extra cost to you. I only link to things I actually use. Full disclosure here.
Leave a Reply
Want to join the discussion?Feel free to contribute!